Review - MaxxAir MaxxFan

 Our motorhome has 3 roof vents. There is one in the bathroom with a tiny little fan, there is one in the kitchen with a Fantastic Fan and there is one in the living area with no fan of any kind.
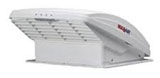
The bathroom fan is that little, noisy piece of junk that manufacturers put in many RVs just so they can say there is a roof vent with a fan. You almost hate to turn it on due to the noise and vibration... but that's for another article. This article is about replacing the roof vent in our living area with a MaxxAir MaxxFan.
 MaxxAir makes several models of the MaxxFan product. The "standard" models have an ordinary vent lid that you open with a hand crank. Then you have the "deluxe" models that come with the fancy rain cover. You can get the manual opening version or the automatic opening version with a remote control. The manual opening 5100K and 6200K are the same except the lid on the 5100K is white and the other is smoke colored. The automatic opening 7000K and 7500K are the same except the lid on the 7000K is white and the other is smoke colored. Here is a handy breakdown of the different features.
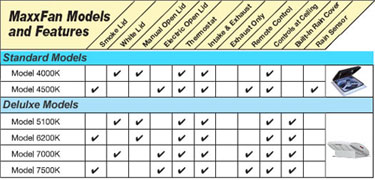
We bought the 5100K because we did not need automatic opening or a remote control, and oddly enough the white lid blocks more light than the smoke lid. We are also on a tight budget so splurging for the other options just didn't make good sense for us.
 When FedEx dropped off our new fan yesterday, we immediately opened it up. The packaging was excellent and unless someone jumped up and down on the box, it would be very hard for it to be damaged during shipping. The full color instructions were easy to read and understand. We made sure all the parts were there and then put it all away since installation would be the following day. We went to the MaxxAir web site and watched the installation video to familiarize ourselves with the whole process. Piece o' cake!
We put butyl tape on the new flange and dropped it in place. We screwed it down using the supplied screws. We then covered the screws and the area around the flange with 4" Eternabond. We placed the fan into the flange, secured it with the 4 supplied screws then headed inside. We attached the power to the fan and it fired right up. We trimmed the inside flashing as per the instructions and secured it in place. That's it, we were done.
This fan is amazing! It will pull air in or blow air out. It can be set to run all the time or none of the time. There is a built in thermostat to help maintain temperature in your RV. My favorite feature is ceiling fan mode! With the outside lid closed, turn the fan on and it will circulate the air in the RV! The engineer who thought of that feature should be up for a Nobel prize!
If you want or need to replace a vent in your RV, get one of these. They are available at most major RV Parts retailers and some models are available at Amazon. You can also browse all MaxxAir products at Amazon.
The MaxxAir MaxxFan offers the following features:
- Ventilator system that protects your RV interior
- A complete system that fits standard RV roof openings
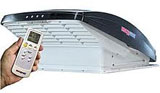
- Opens and closes like most standard roof vents using a manual knob located at the ceiling or opens automatically with optional Remote Control
- Includes a powerful 10-speed fan, thermostat, air intake and exhaust functions
- Visit the official MaxxAir MaxxFan web site for more information.
Overall, we give the MaxxAir MaxxFan a 5 out of 5!
Click here to see an installation guide for the MaxxFan.