Hilarious video of our 2014 road trip to 22 states and 15 national parks...


Ram ProMaster RV Camper Van Conversion - Portable Air Conditioner
This is the original conversion we did. If you are looking for the index page of this project, click here. If you want to see the new build, click here.DIY Campervan Portable Air Conditioner Installation
We originally installed a 6000 BTU window air conditioner in the van, but it was not up to the task... especially in this Alabama heat. You can read about that part of the project on this page. So we ordered a new 14000 BTU Portable Air Conditioner from Amazon and it arrived 2 days later thanks to Amazon Prime.

Since we had already installed an exhaust vent in the side of then van, that made this installation go very quickly. All we had to do was position the unit in the only practical place it would go, hook up the drains and exhaust and fire it up. Even though that sounds simple, it took about 2 hours to complete.
Step 1 was positioning the unit and securing it. Since it sits on little casters, we didn't want it rolling around as we drove the van. A quick and easy solution was to use a strap to hold it in place. We installed some screw eyes then strapped it down. It doesn't budge a bit when we are driving.
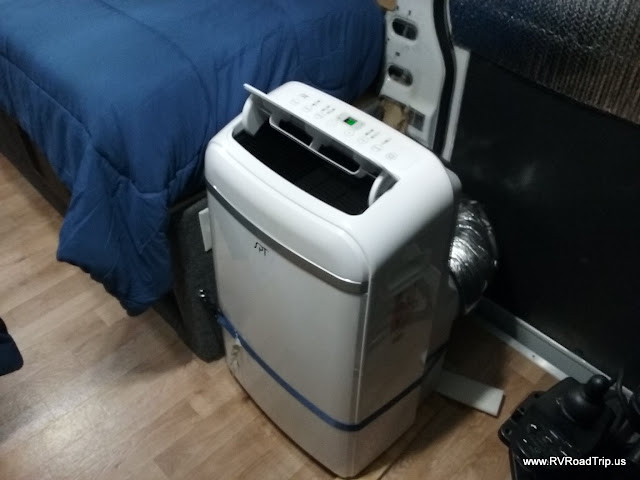
Step 2 was to hook up the drains and the exhaust. A quick trip to the local hardware store took care of the drains. We bought a "Y" hose so we could run the top drain (for the A/C part) and the bottom drain (for the heater part) out one tube through the van floor. Thankfully, washing machine hoses use the same fitting as the A/C so the hoses were ready made and in stock. Bonus! The exhaust hose routes the hot air to the outside. The unit take air from inside the camper and uses it to cool the compressor, the result is very hot exhaust air. The hose that came with the unit does the job but it is not insulated so it put outs a lot of heat inside the van. No worries, we had plenty of the UltraTouch insulation left so we covered up the exhaust hose. We built a little angled box to deflect the heat from the hose out the side of the van, otherwise we would have had to bend the hose 90°. We used foam insulation that has a radiant barrier on one side to fabricate the box. It fits the 12" exterior vent and the 6" exhaust hose. Now all the heat goes outside.

Step 3 was to turn it on and enjoy the nice cold air! Even with 14000 BTUs, the rear of the van would be the last to get cool because of how the air circulates around the inside of the van (it tends to loop in the wheelchair area). An easy fix was a small fan that blows the cold air directly to the back of the van. This setup keeps the inside of the van about 70° when the outside is in the 90s. We do use insulation on the windows because that generates the most heat. All of the windows are covered a radiant barrier (Reflectix) and we use a curtain to divide the cab area from the rest of the van. It is not necessary to try to cool the cab on those extremely hot days. In milder temps, we don't use the curtain.
It is a shame the 6000 BTU window unit wouldn't work when mounted near the floor. Oh well, we sacrifice a little floor space for a very efficient air conditioner. Another bonus is we are still under 9' tall so we can go still through the drive thru at Chick-Fil-A! If we had put an RV style roof mounted A/C on the van, we would be over 9 feet.
A little advice if you are adding an A/C to your RV or van... buy the SquareTrade warranty if it is available to you. We bought the 3 year extended warranty and it kicks in after the manufacturer's warranty runs out. It covers the unit for repair or replacement and covers shipping both ways. It was roughly $46 for the 3 year warranty on this A/C, so for about $15 a year, we are covered! That being said, I hope I never have to use either warranty!